Cloud Backend overview
The ESP RainMaker Neo cloud backend is the service that sits between devices and the people using them: it authenticates both users and devices, carries state in each direction, stores nodes and their groupings, and exposes all of this over REST or MQTT. Repository is available at esp-rainmaker-neo, built entirely from managed AWS services, and it runs in an AWS account you control.
Espressif runs a public ESP RainMaker Neo deployment for evaluation and hobbyist use with a quota of 20 devices per user, and you do not need any of this section to use it — see Get Started. Everything below is for a private deployment in your own account.
What it does for you
- Identity and access — Cognito user pools for end users and for administrators, exchanged for short-lived AWS credentials that sign REST calls and authorise MQTT.
- Device plane — AWS IoT Core with X.509 mutual TLS, topic rules that route device messages to handlers, and connect/disconnect events that keep online state current.
- State and storage — nodes, users, groups, associations and sharing requests in DynamoDB, with device state held in shadows.
- APIs — an API Gateway REST API for end-users and admins, plus the MQTT topics devices and apps publish and subscribe to.
- Admin Dashboard — the web console for the deployment used for configuration.
- Voice assistant skills — Alexa, Google Voice Assistant and Samsung SmartThings integrations for voice based configurations.
What you supply is the AWS account, and — if you are extending it — handlers for whatever the platform does not already do.
How it is built
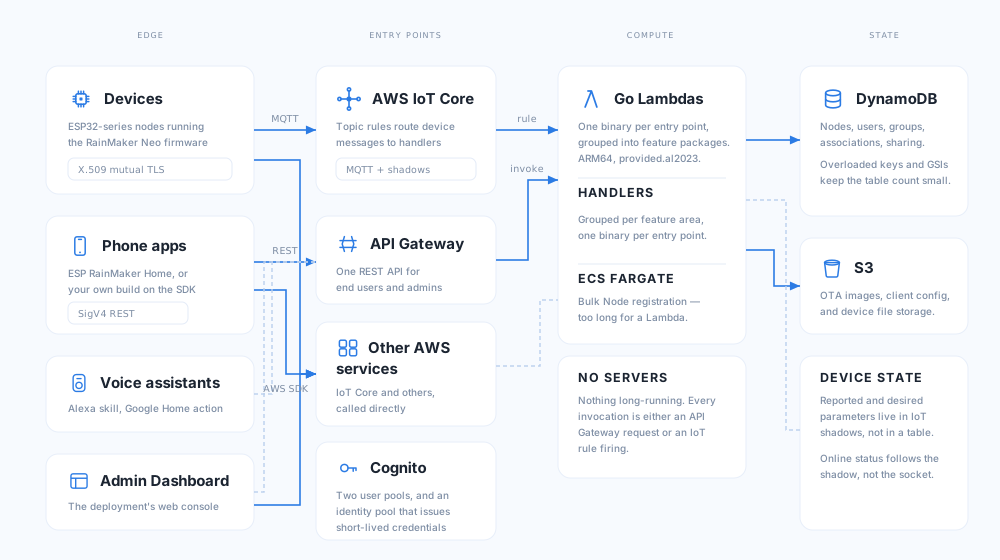
Two ways to get a deployment
- You can install Espressif's published CloudFormation templates through the Cloud Installer — a small stack whose dashboard lets you pick a version and fill in parameters, with no local toolchain. We call this "Packaged" RainMaker Neo. It is the easiest way to get started and is suitable for most use cases.
- You can deploy from source with AWS CDK, which is the route to take if you intend to modify the backend or run it from your own CI.
Both produce the exact same backend. Deploying ESP RainMaker Neo compares them and describes what you take on once a deployment exists.
Working on the backend itself
The repository is a Go workspace for the Lambda handlers plus a Python CDK app for the infrastructure, and the top-level Makefile is the entry point for every workflow.
The mock-based unit tests carry the bulk of the coverage because they parallelise and run fast; the integration tests exist for the things only a real deployment shows you, such as a missing permission or an unattached IoT policy. Both have to pass, in that order.
Where to start
| You want to | Go to |
|---|---|
| Get a deployment running now | Deploy With Installer |
| Add an endpoint, rule or handler | Extending the Cloud Backend |
| Call the service from a client | API Reference |
Related
- System architecture — the concepts behind these components
- Security model — who is allowed to reach what
- Admin Dashboard — the console this backend deploys
- Firmware SDK overview — the other half of the same contract
- Cloud specifications — per-feature behaviour in exact terms